Meet Your New Digital Assistant

Generate New Leads
KvCORE has both free and paid options to help you get fresh leads and contacts into your CRM. Contacts are the fuel that feeds your business, therefore you’ll want a solid lead generation strategy. With KvCORE, you can try out different techniques and see what works best for you.
Free Options:
- Seller Valuation Report
- Squeeze Pages
- Landing Pages
- Call/Text Capture
Paid Options:
Paid lead generation options are available to you in KvCORE’s Marketplace, and may change at any time. While there’s lots of great stuff available for you to use, it’s important to understand that none of it is mandatory.

Seller Valuation Tool
The seller valuation tool within KvCORE is used to offer an estimated value with the address of that property.
The seller valuation report can be assigned to a contact from both the KvCORE websites as well as within each individual contact profile. Home valuations are a great way to capture seller-focused leads using KvCORE and provide current seller leads with a free home valuation.
Pro Tip:
Seller Valuation emails in KvCORE are only sent manually. There is no automated monthly email option for sending these reports.
For an automated monthly touchpoint, consider subscribing your contacts to a Market Report that applies to the area surrounding their home. Or, consider setting up task reminders related to the contacts you’d like to send reports to on a regular basis.
What Does A Report Include?
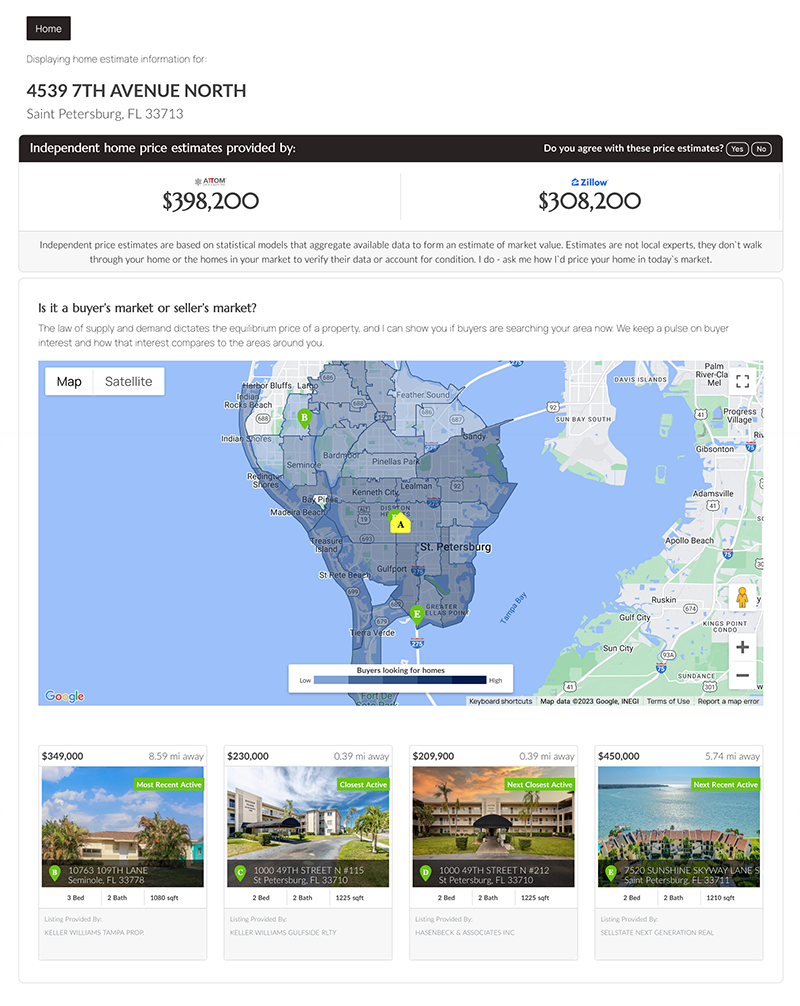
Here’s a sample to review, as well as a brief description of the sections and elements.
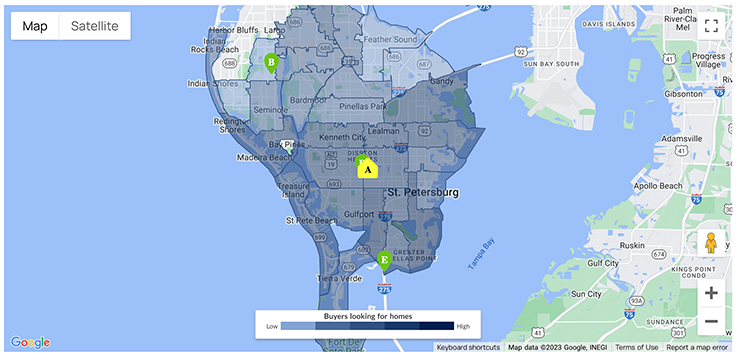
Heat Map
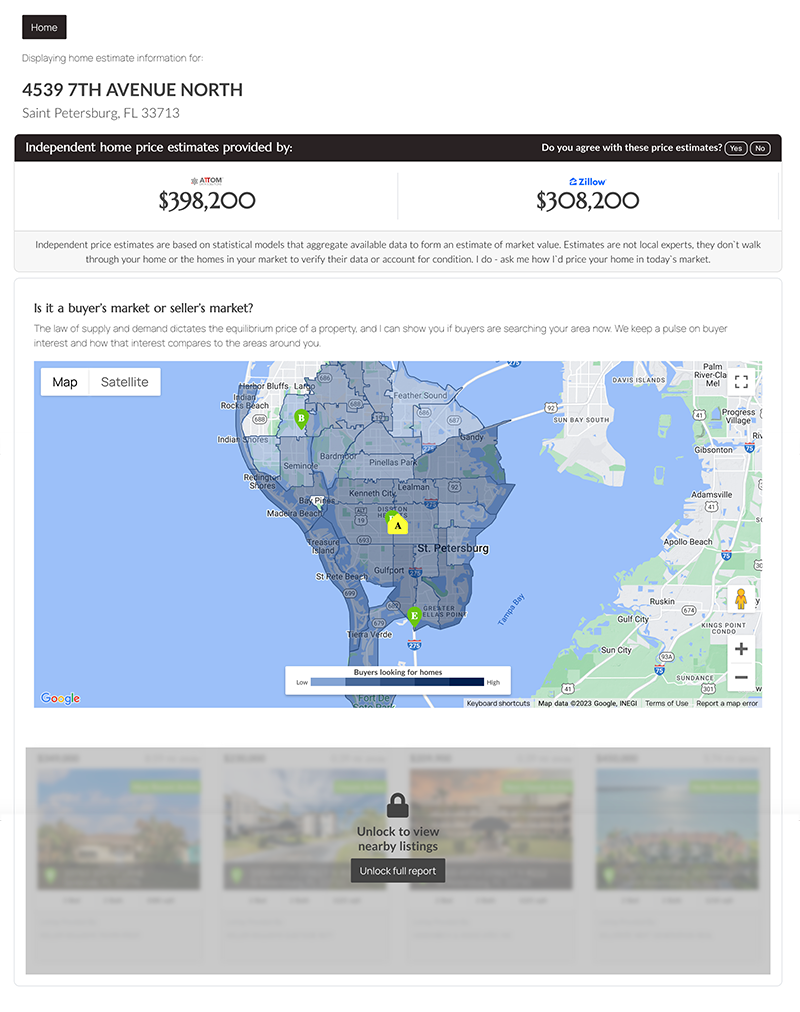
The heat map will show general Buyer interest, with the darker portions indicating the highest interest. The Buyer interest on the heat map is pulled directly from the MLS.
The pins on the heat map will show property info underneath the map, showing the most recent active, closest active, most recent sold, and closest sold, as well as property information such as bed/bath.
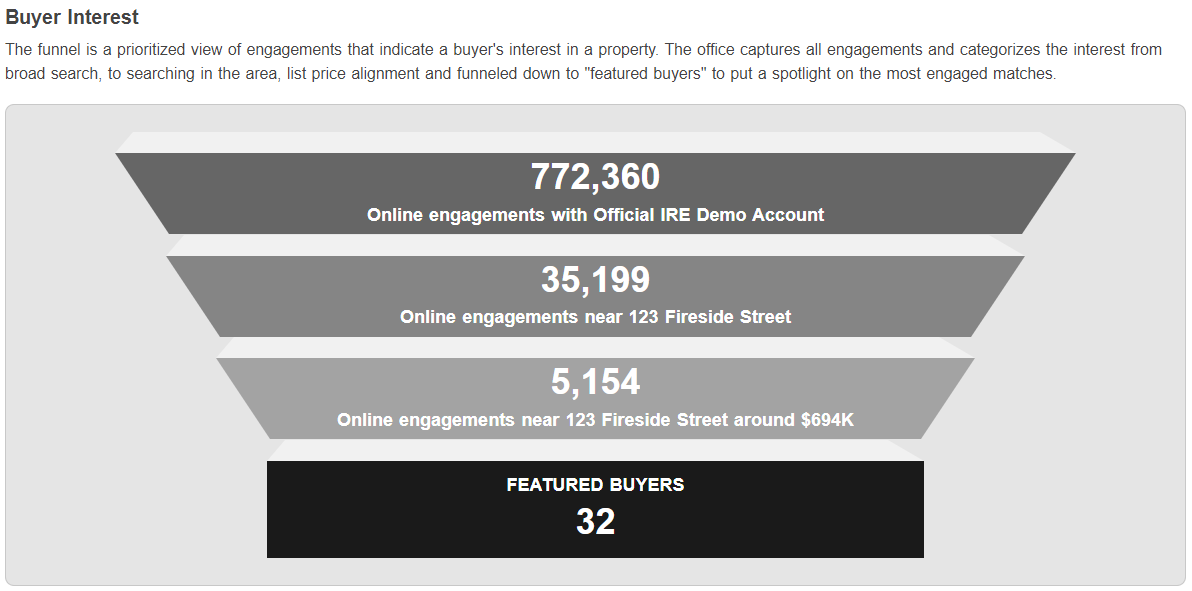
Buyer Interest Funnel
The funnel is a prioritized view of engagements that indicate a Buyer’s interest in a property.
The Company captures all engagements and categorizes the interest from broad search, to searching in the area, list price alignment, and funneled down to “Featured Buyers” to put a spotlight on the most engaged matches.
Setting It Up From A Contact Record
You can add a Seller Valuation directly from within a contact’s profile in your Smart CRM. This option allows you to send the valuation report without the lead requesting one themselves from the ‘Sell’ tab.
Step #1
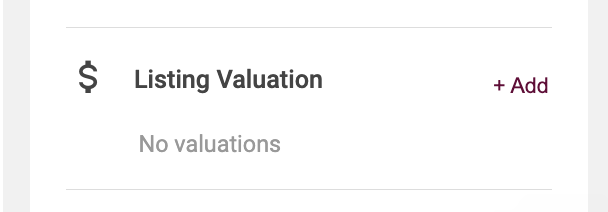
While looking at a contact’s profile, go to the menu to the right of the contact profile and scroll down to ‘Listing Valuation’.
Step #2
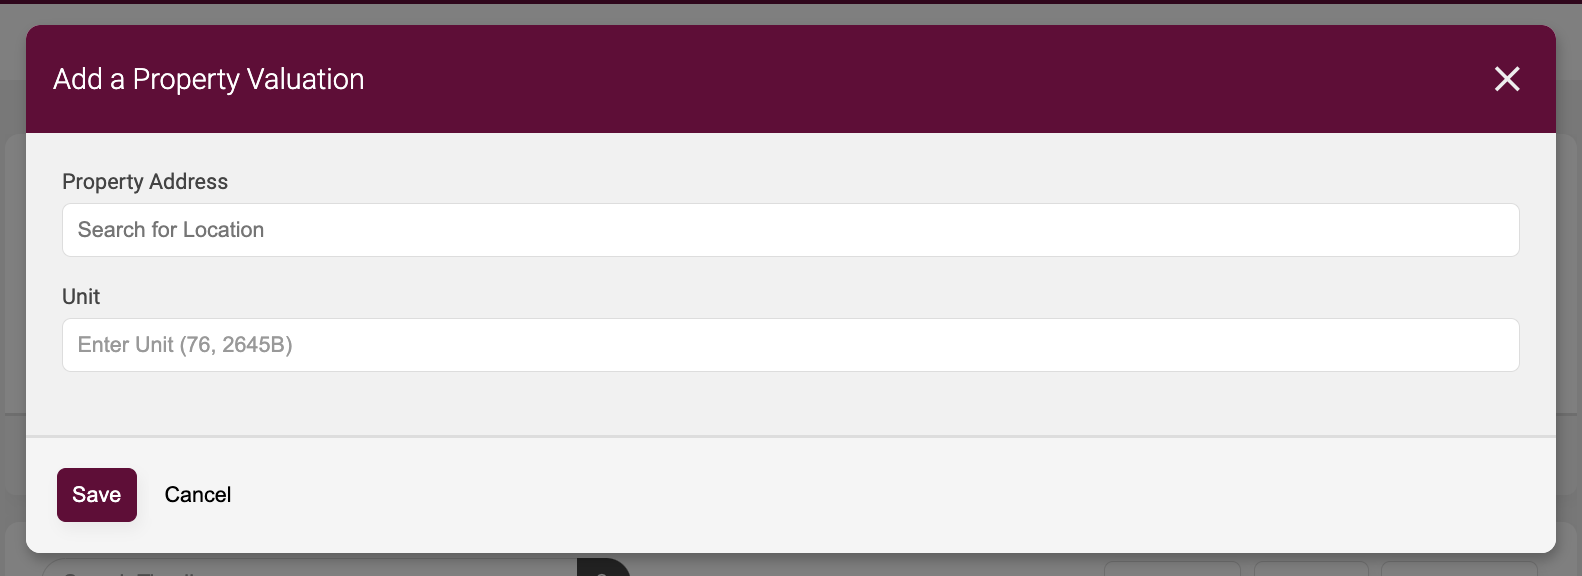
Add the address and click ‘Save’.
Step #3
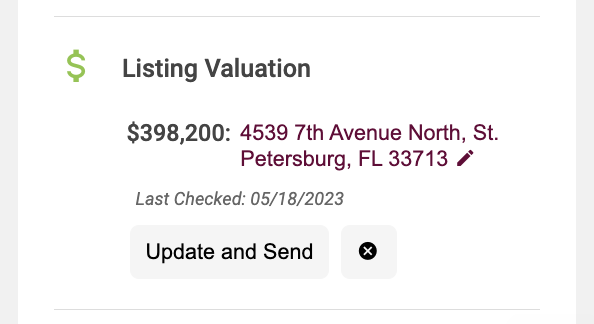
To send the valuation to your contact click the ‘Send Now’ button.
What’s The Consumer Sign-Up Experience Like?
Every agent website includes a ‘Sell’ page, which is where a consumer can request. a home valuation. You also have the ability to create landing pages which drive traffic to the home valuation tool in marketing campaigns and on social media.
No mater how they get there, the experience a consumer will have while interacting with the page is the same.
STEP #1
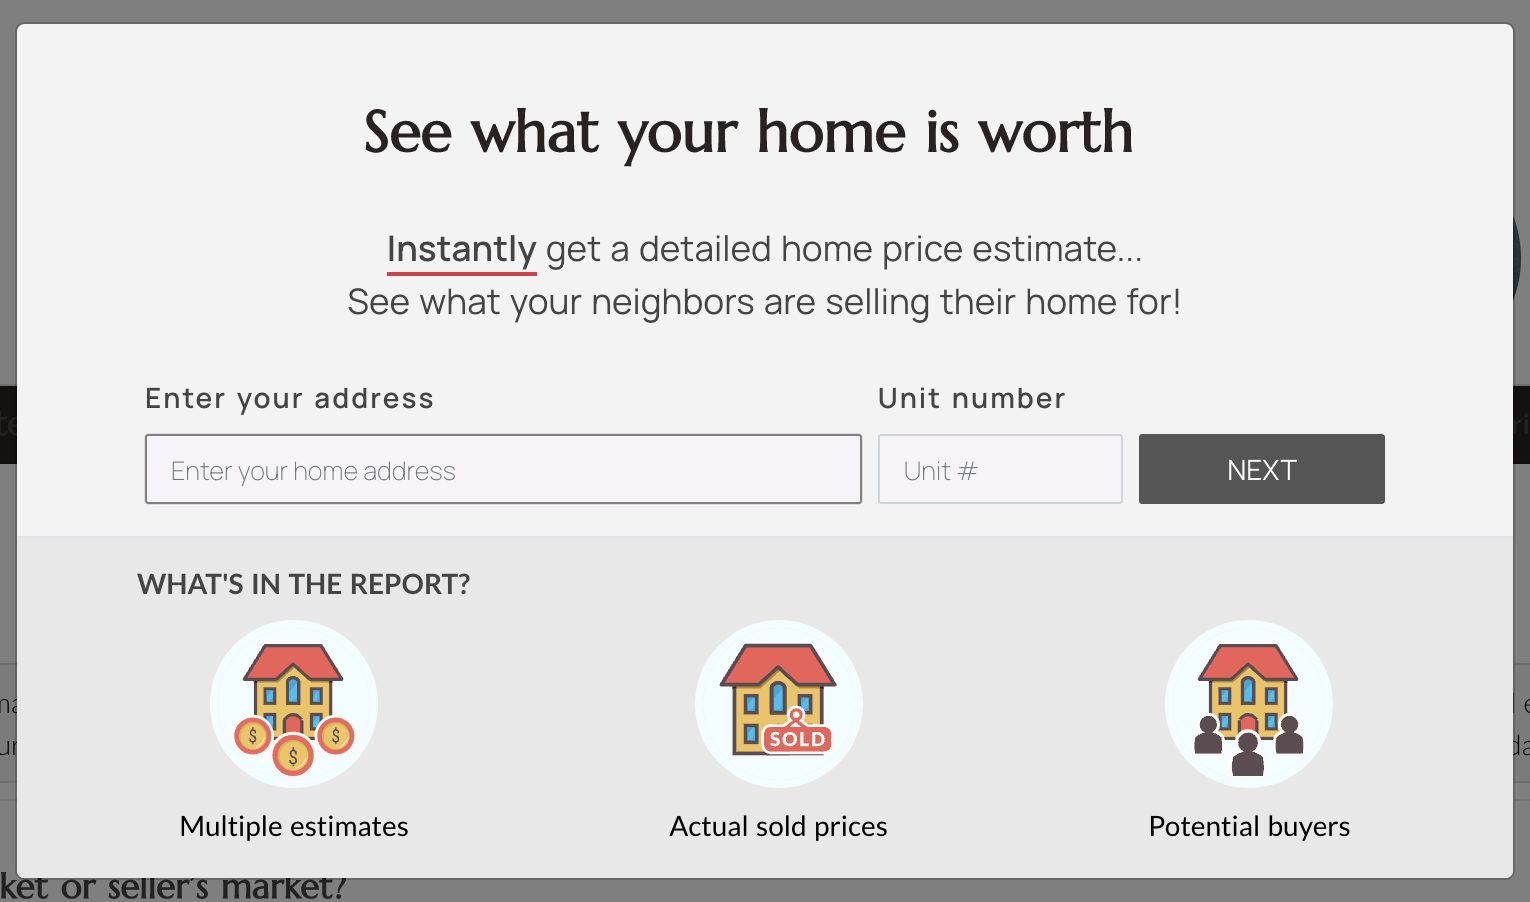
Upon landing on your ‘Sell’ page, your website visitor will see the following prompt.
STEP #2
After adding the address and selecting ‘Next’ your website visitor will be taken to the limited version of Valuation Report which offers homeowners multiple automated home value estimates.
They will be able to view these estimates before adding in their contact info – but to view more they must give their opinion on the valuation or click into one of the locked report areas.
STEP #3
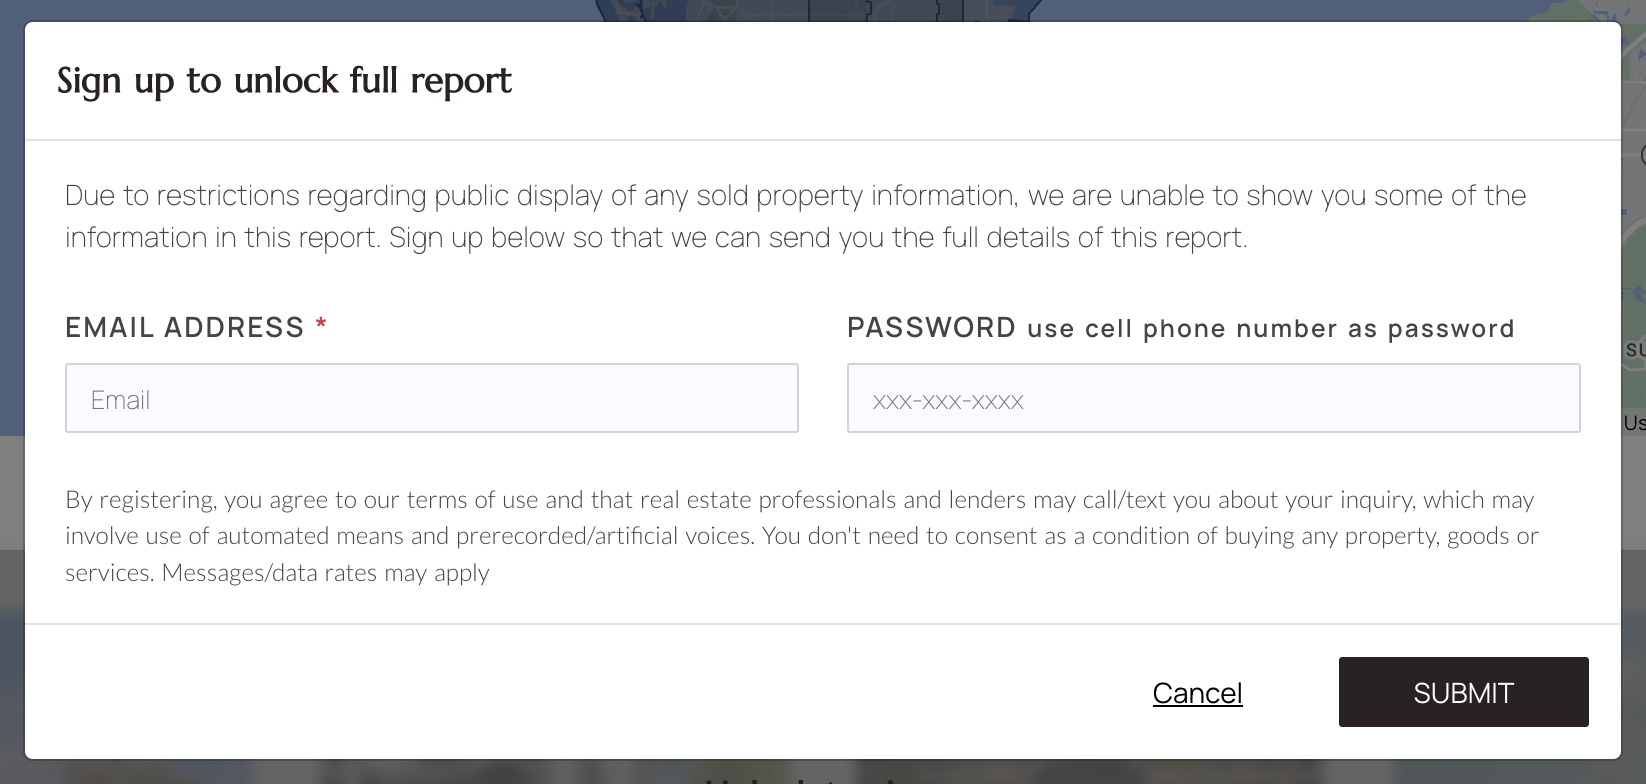
If the consumer clicks into. a locked area, they’ll be brought to a sign-up screen, which upon submission will create an account on your website.
STEP #4
After submitting contact information, the consumer will have full access to the report data, and you’ve got a new lead in your Smart CRM.

Would you like to know more about the Seller Valuation tool? Check out this support article.

Squeeze Pages
In KvCORE, a squeeze page allows you to create a page of listings based on a customized search, and add it to your website! It also includes an option for driving traffic to your Seller Valuation and Market Reports pages. This tool is FREE, and you can create as many as you’d like!
For example, if you know the average buyer would look for homes in a particular area or price range, you can set up a squeeze page that brings them to listings matching those criteria! From there you can share it on social media or even add it as a permanent page on your website.
Or perhaps you’ve decided to do a quarterly promotion related to Market Reports, encouraging people to sign up for monthly updates via email. You can set up a squeeze page that brings them to the Market Report sign-up page on your site.
Why Use Them?
The true power of Squeeze Pages is that they track statistics, giving you insight into which of your advertising and marketing efforts are working. Once you know that, you can streamline your business and focus only on what’s actually delivering you results.
These pages offer you the ability to see how many people have visited the link and how many people have signed up as a result.
The 5 Types Of Squeeze Pages
Single Property
For those times when you’d like to advertise one particular property.
Multi-Property
A page of multiple on-market listings, great for sourcing buyers interested in a particular area.
Sold Multi-Property
A page of multiple sold listings, great for showing homeowners what’s happening in the market in their area.
Seller Squeeze
Perfect for driving traffic to your Sell page, which contains your Seller Valuation tool.
Market Report
Encourage visitors to sign up for a Market Report on the area you choose which includes avg price, avg sold price, and recent listings.
Pro tip:
Using the ‘Sell’ page directly as part of a lead funnel does have its uses. However, if you are running an advertising campaign, using a Landing Page to serve as the interface between the advertisement and the ‘Sell’ page will net you the best results.
Pushing the ‘Sell’ page directly, which uses the title “Instantly Find Your Home’s Value”, may not always speak to homeowners and can attract renters as well.
The ‘Address Capture’ option for Landing Pages would be the best bet for Seller advertising. However, if you are using some kind of call to action where you simply need an address capture form directly, the Seller Squeeze Page will work.
Squeeze Page Settings
Here’s a brief review of the setting options you’ll want to review when creating a Squeeze Page. If you’re creating a property-related page and need assistance with setting up the search criteria, you can refer to this guide.
Source
Make sure you can accurately track where leads are coming from. Plan on sharing the squeeze page on Facebook? Set the ‘Source” value to ‘Facebook’.
Plan on sharing it in multiple locations? Create a unique Squeeze Page for each source so you can compare and see which source brings the most traffic and leads.
Hashtag
Automatically apply the hashtag(s) of your choice to leads that are generated by your Squeeze Page. This makes them very easy to find in your Smart CRM in the future.
In addition, you can create Smart Campaigns specifically related to these leads which begin when the hashtag is applied to a lead. A pre-configured search alert for similar homes, for example.
Cover Photo
You always want to make sure things are looking their best when you’re going to be sharing them on social media!
Make sure to add a cover photo to your Squeeze page, which is the image that will appear in your social post. the more eye-catching, the better!
Registration
Chances are, the default registration policy on your website may encourage a user to register to see more than a few properties.
If desired, you can override that setting for leads that arrive at your site when their entry point is a particular Squeeze Page.
Creating Your Links
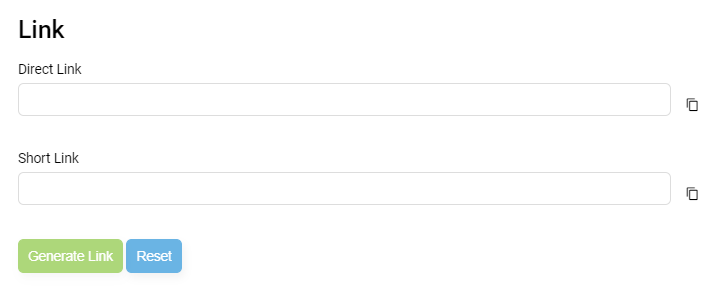
Once all of your criteria and configurations are set, you can generate your link. You can copy these links using the icon to the right of each box. Save them in a note or spreadsheet for easy reference in the future!
- Direct Link – This box will contain the full link with all of the criteria you set. This type of link is typically required for Google Advertisements.
- Short Link – This box contains an abbreviated link that will take people to the same results. However, the link is a bit shorter which makes it usable for mediums like text messages and spaces like Twitter where the number of characters you’re allowed to use in your post is very limited.
View Your Squeeze Page History
To view your previously created squeeze page, and their links, navigate to Lead Engine > Build Squeeze Page and select the ‘History’ tab at the top.
Each record will provide you with: Date, Type, Area/MLS ID, Hashtag and the ability to copy its link.
Please Note: Only Squeeze Pages created using the Squeeze Page Builder will show in the history. If you create custom squeeze page links (mentioned below), you’ll need to record those details separately. They will not be recorded here.
Pro tip:
Get in the habit of creating squeeze pages on a regular basis and using them to share on social media. Think “house of the day” or neighborhood of the week”. This will drive organic traffic back to your website and can also reinforce your expertise in areas or neighborhoods you’re currently farming!
Only Brokerage Listings
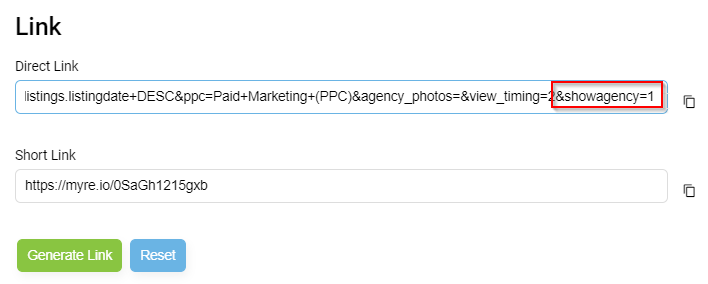
In the case that you’d like your Multi-Property Squeeze Page to showcase only our brokerage’s listings you can add “&showagency=1” to the end of the Squeeze Page link you create.
A More Customized Squeeze Page
This is a more advanced option and is NOT required in order to utilize Squeeze Pages. The process is more manual, and a little technical, but can be worth it in the end depending on your goals.
In some cases, you will want to create a search of properties that have more criteria than what the Squeeze Page Builder includes. In that case, you can create your own Squeeze Pages by hand on your kvCORE website when needed. This is a perfect solution when you want search results that are more detailed.
The Steps Involved
What makes it a Squeeze Page link is always the source and hashtag that you add to the end of the URL. This is what enables the tracking statistics that you will use to monitor your link and advertising performance in business analytics.
When creating Custom Squeeze Page links, always remember to include those parameters at the end of the link. The source and hashtag are the same as you would specify in the text box in any of the other squeeze link builders.
STEP #1
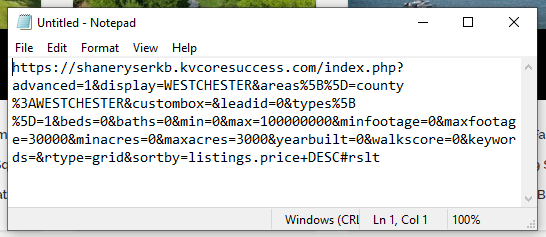
First, go to your KvCORE website and perform a property search to get the exact results you want your potential leads to see. Then, when you are satisfied with the search results you see displayed, copy the URL from the address bar of your browser.


STEP #2
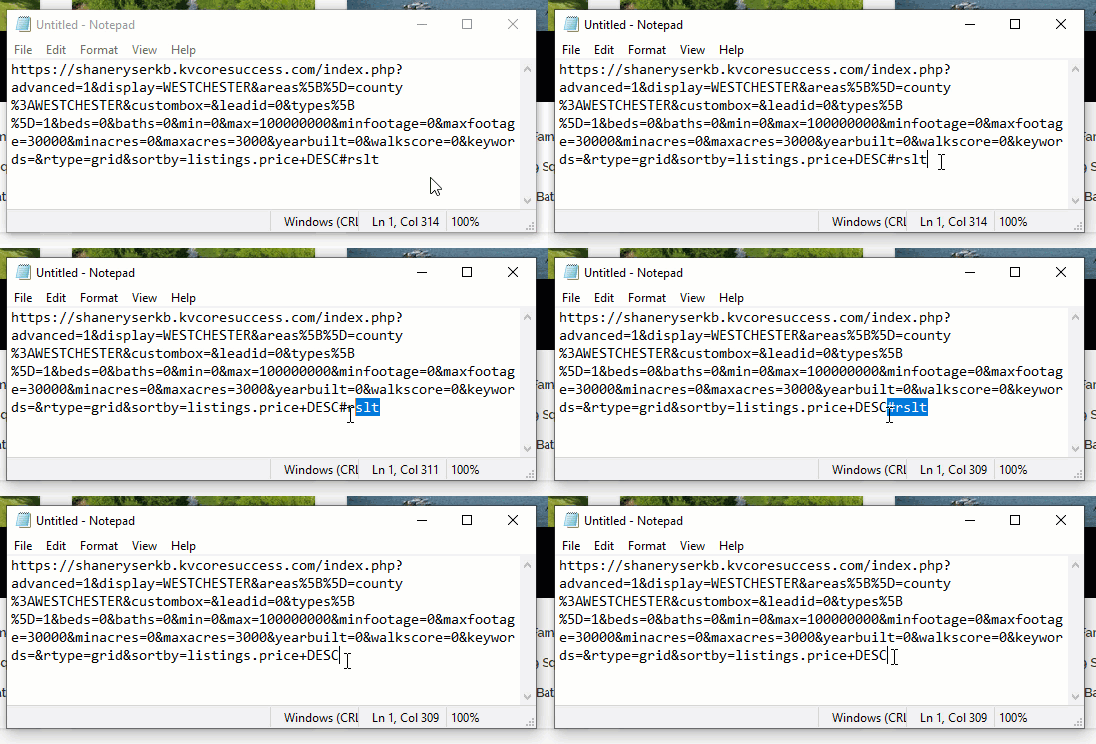
Next, paste the URL into a text editor so it can be edited easily. Here, you will manually add the pieces to the end of the URL that will make it a trackable squeeze page.
STEP #3
Delete ‘#rslt’ at the end.
STEP #4
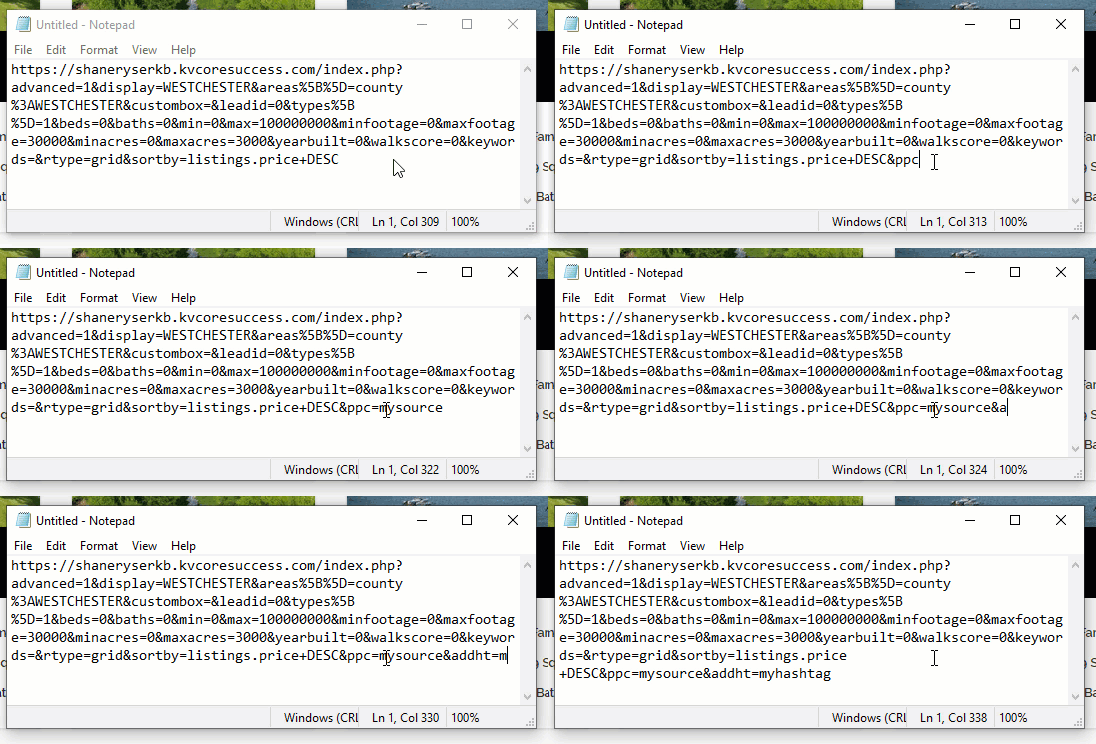
Then, add the source and hashtag parameters by hand. You enter what you would like your source name to be, as well as the hashtag you want to be attached to the contacts who sign up.
Please Note: When entering a hashtag do NOT include the ‘#.’
You’ll use the following format to tack your parameters on the end of the link. With this sample, your Source for any leads submitting the form on the Squeeze Page would become “mysource” and the hashtag applied to the lead would be “myhashtag”
Parameter sample:
&ppc=mysource&addht=myhashtag
All set! You can now copy your newly formed custom Squeeze Page link and use it in your advertisements.
A Squeeze Page For Specific Properties
This is a more advanced option and is NOT required in order to utilize Squeeze Pages. The process is more manual, and a little technical, but can be worth it in the end depending on your goals.
If you want to showcase a list of particular properties for an advertisement, you can build a Squeeze Page of them manually. To create a custom Squeeze Page of particular listings, you can build a link using the four main components shown below.
The Steps Involved
What makes it a Squeeze Page link is always the source and hashtag that you add to the end of the URL. This is what enables the tracking statistics that you will use to monitor your link and advertising performance in business analytics.
When creating Custom Squeeze Page links, always remember to include those parameters at the end of the link. The source and hashtag are the same as you would specify in the text box in any of the other squeeze link builders.
STEP #1
First copy your site’s URL. It should look similar to this, including the “/index.php” on the end. Paste the URL into a text editor so you can edit it.
Sample Starting URL: https://{username}.bhhsfloridaproperties.com/index.php
STEP #2
Next, add the following parameter onto the end of the link:
Parameter: ?mlsids=
STEP #3
Then enter the MLS IDs for the properties you’d like to feature, separated by commas with no spaces.
Sample MLS ID Format: T123456,U345678,T987654,U543210
STEP #4
Then, add the source and hashtag parameters. You’ll enter what you would like your source name to be, as well as the hashtag you want to be attached to the contacts who sign up. Please Note: When entering a hashtag do NOT include the ‘#.’
You’ll use the following format to tack your parameters on the end of the link. With this sample, your Source for any leads submitting the form on the Squeeze Page would become “mysource” and the hashtag applied to the lead would be “myhashtag”
Parameter Sample: &ppc=mysource&addht=myhashtag
STEP #5
All set! The full URL for the custom squeeze page will look like the sample below. You can now copy your newly formed custom Squeeze Page link and use it in your advertisements.
Sample Finished URL: https://{username}.bhhsfloridaproperties.com/index.php?mlsids=T123456,U345678,T987654,U543210&ppc=mysource&addht=myhashtag”
Would you like to know more about Squeeze Pages? Check out this support article.

Landing Pages
KvCORE’s Landing Pages are standalone pages that capture leads and drive visitors to your website. They allow you to target niche audiences with ease!
They can also be used to advertise you and your business, opt contacts into a monthly newsletter, or begin a conversation on Facebook Messenger.
Pro tip:
Keep in mind that once a landing page is saved, it cannot be edited. Be 100% sure you’re done editing before saving.
Types Of Landing Pages
Lead Generation
Includes spots for a title, subtitle, bullet points, and a form to gather lead’s contact information. You’ll need a call-to-action that entices people to complete the form.
Video View
Includes a spot to embed the video of your choosing, and can be used to feature you or your business!
Video + Lead
Includes spots for a title, subtitle, bullet points, a video of your choosing, and a form to gather lead’s contact information. You’ll need a call-to-action that entices people to complete the form. Can be used to feature you or your business, and collect leads along the way.
Text Lead
leverages custom text codes to capture valid phone numbers
Address Capture
Designed for new seller leads.
Facebook Chat
Initiates a conversation with you through your Facebook Business Page’s Messenger functionality.
Content Hijack
A clever way to guide someone’s interest. This allows you to perform a classic marketing tactic, where you offer something that someone wants in your ad, but when they click on the ad, you offer them something else instead. (However, you still give them the option for what they thought they were getting.)
Landing Page Settings
Landing Page settings exist that allow you to control the page design in regards to editing templated content (or removing text boxes if they’re not needed), updating background images and elements, what page the lead is brought to after the form is submitted, and what their lead type should be when they’re added to your Smart CRM.
Adding Hashtags
Automatically apply the hashtag(s) of your choice to leads that are generated by your Landing Page. This makes them very easy to find in your Smart CRM in the future.
In addition, you can create Smart Campaigns specifically related to these leads which begin when the hashtag is applied to a lead. A pre-configured search alert for similar homes, for example.
Customizing Your Landing Page
When customizing your landing page, there is a basic 1-2 rule to follow.
STEP #1
Customize all your options up top, from landing type to your background image. Start from left to right.
Step #2
Customize your text on the page. Just click on the text on the page to change it.
Uploading A Background Image
Most of the time one of the default images or a listing image from the MLS will suffice for the content of the landing page you are creating, but you will probably want to use a custom image for the background of a recruiting landing page or a holiday-specific landing page.
Because you cannot upload an image directly onto a landing page you will need to host (upload) your image on another platform and then use the URL (link) on your landing page.
We want you focused on building your business, not worried about how and where to host images. So… we built you an uploader!
Tips & Tricks
While editing, you can remove elements by double-clicking them.
If you delete an element by accident, you can refresh your page. The settings up top will remain, but all the text in the middle will be reset.
When using a custom image, try to select an image that is relevant!
For example, if you are circle-prospecting a neighborhood, you should find a picture of a neighborhood that looks similar.
After everything looks good to you, click ‘SAVE’ on the upper right.
This finalizes the page, and the URL at the top becomes permanent.
View Your Landing Page History
To view your previously created Landing Pages and their links, navigate to the main Lead Engine page. Find the Landing Pages section and click ‘Past Landing Pages’.
Each record will provide you with: Date, Type, Area/MLS ID, Hashtag, number of views, and the ability to copy its link.
Pro tip:
When adding your own background images for your Landing Pages, PLEASE make sure that you either have permission to use that image or to use an image that you own. Otherwise, you run the risk of violating the intellectual properties of images that you don’t own which could result in legal action.
Two great sources for royalty-free images are https://www.pexels.com/ and https://unsplash.com/ Please DO NOT use downloaded images from a random Google search!
Would you like to know more about Landing Pages? Check out this support article.

What Is A Smart Number
Each of our offices has its own Smart Number assigned! This is a fully digital number that is responsible for routing inbound calls and texts to the correct agent.
It’s ‘Smart’ because it can tell the difference between your contacts and another agent’s contacts within your office.
A Smart Number Knows:
- Your cellphone number, and the cellphones of the other users in your
- Office/account
- Your contacts’ phone numbers
- Your Office numbers
- Which contacts/leads belong to whom
- Who contacted which contact last
- What auto-communications went to which contact last
How do I find my Smart Number?
Click on your name in the top right hand corner, and your Smart Number will appear at the top of the list.
You’ll also see it in Lead Engine > Call and Text Capture.
How many Smart Numbers will I have?
Most users will only have one Smart Number – the one associated with their office. However, team members may also see one that’s associated with their team.
DON’T TEST WITH YOUR OWN NUMBER.
(We know… that’s like waving a red flag in front of a bull. But it’s really for the best!)
We know you’re curious. It’s understandable. But please DO NOT test any Smart Number using your mobile phone or your office line. It will only cause system issues and headaches. Testing calls or texts from your own number can result in possible misrouting both during your test and later on when real people call or text.
Why?
When you add yourself as a text lead or try calling the Smart Number to test call routing you’re not considering this, but what it boils down to is the system cannot call or text itself! Remember, all of our office numbers and your cell phone number are stored in KvCORE, attached to personal accounts, office listings, the company roster, etc. By calling or texting from the same number the system is trying to route to, it creates a circular loop.
Still want to test? We get it! But please do it using a spouse, partner, or close friend’s phone to avoid routing problems both during your test and in the future.
When does KvCORE Use A Smart Number?
If you choose to get New Lead alerts via phone or text message, KvCORE uses the Smart Number to notify you.
If a lead sends you a text, it is forwarded to you from the Smart Number. You will see the message but should reply via KvCORE so the lead gets the reply from the same number they texted. On the go? Use the app to respond!
If you create a custom text code, and the text lead sends it to your Smart Number, you will be forwarded the information as if one of your leads texted you.
If you use the KvCORE Dialer from the website version of the system to make outbound calls from your call list.
How Does A Smart Number Route Calls And Texts?
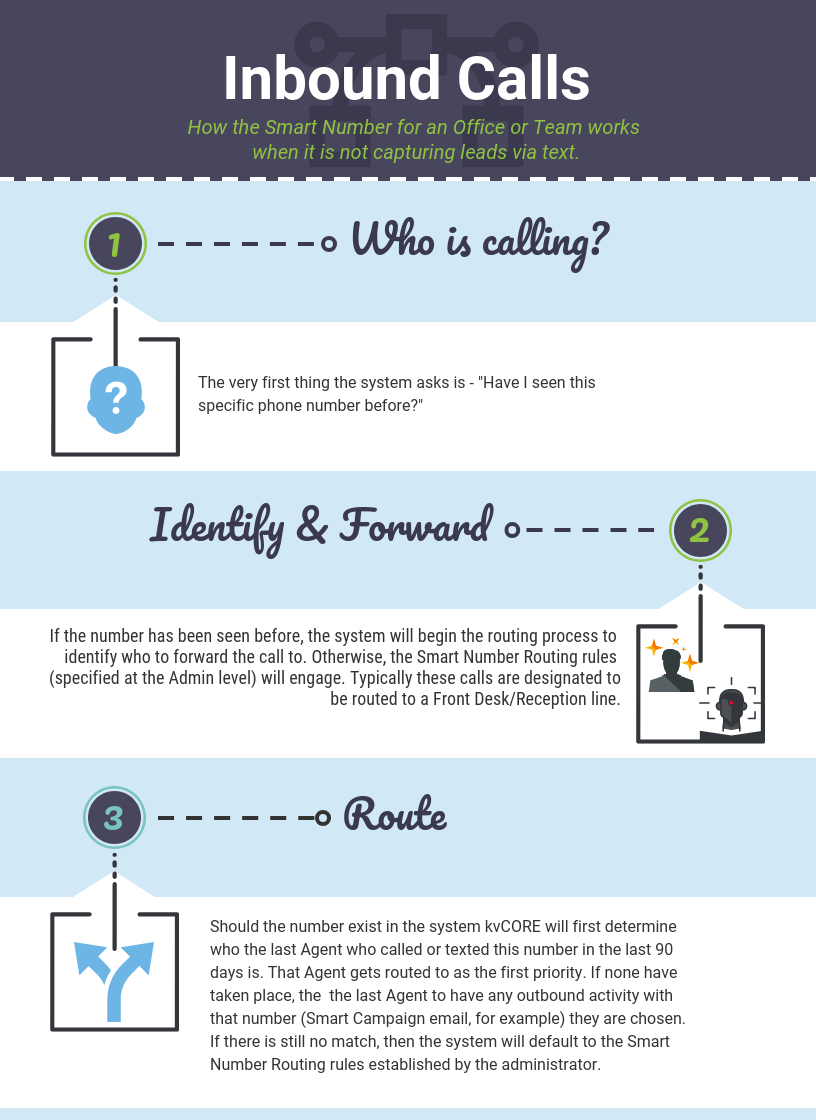
When a call or text comes into the Smart Number, it looks at the contacts in your Smart CRM to match the phone number. In order for KvCORE to route calls and texts, a contact must already exist in your account and the phone number they’re using must be in the contact record.
Because of this, it’s very important to note that you should not give this number out to a potential lead whose information is not in your Smart CRM. If KvCORE does not recognize the number which is calling or texting, it will be routed through your office as a new lead generated by the company and potentially be delivered to another agent.
The only exception to that rule is text codes.
The unique text codes that you create are tied directly to YOUR account and are designed to use the Smart Number to capture new phone leads for you. Regardless of whether the number texting is stored in your Smart CRM account, because the Text Code is tied to you, the contact will be too.
Do I need to purchase my own Smart Number?
Most users should not have a need for purchasing their own number.
The key to making sure you receive all of your Smart Number calls is only providing the number to contacts that are already in your account, since that’s how the calls and text are routed. As long as it’s only given to contacts within your account (with phone numbers present), or used for text code campaigns, you’re all set!
However, if you’d feel more comfortable with your own you can purchase one from within the Marketplace for a cost of $27/mo. Having your own Smart Number means that whenever a potential lead whose information you don’t have yet calls or texts your Smart Number will capture their phone number and add it to your Smart CRM every time.
Can I use my cell number or an existing digital number like Google Voice?
No. The number has to be specifically tied to KvCORE, and needs to be selected from within the system.

Using Text Codes
To do this all you need is your office’s smart number and your personal text code that’s automatically generated for you. Think “Text JANEDOE to 555-123-1234”.
When potential leads text this code to the Smart Number, KvCORE will capture their number and add them to your Smart CRM as a new phone lead. You can also create your own codes that potential leads can text to the Smart Number instead of the default one you were assigned.
On A Shared Number?
Yes. It works! While your default Smart Number is shared by each agent in your office, it’s the Text Code itself that makes the magic happen.
Each code is unique to a particular user’s account, and that’s how the system knows where to route the lead. As long as the text code is used when texting your office’s Smart Number, the person reaching out will be added to your Smart CRM as a New Lead.
DON’T TEST WITH YOUR OWN NUMBER.
(We know… that’s like waving a red flag in front of a bull. But it’s really for the best!)
We know you’re curious. It’s understandable. But please DO NOT test any Smart Number using your mobile phone or your office line. It will only cause system issues and headaches. Testing calls or texts from your own number can result in possible misrouting both during your test and later on when real people call or text.
Why?
When you add yourself as a text lead or try calling the Smart Number to test call routing you’re not considering this, but what it boils down to is the system cannot call or text itself! Remember, all of our office numbers and your cell phone number are stored in KvCORE, attached to personal accounts, office listings, the company roster, etc. By calling or texting from the same number the system is trying to route to, it creates a circular loop.
Still want to test? We get it! But please do it using a spouse, partner, or close friend’s phone to avoid routing problems both during your test and in the future.
Ok, But How Do I Use It In Real Life?
Let’s say we want to advertise an open house. We can create a Text Code with the property address – 123MainStOpen, for example. While we’re setting the text code up we’ll associate the property’s MLS ID with it so when anyone texts your code, a response will be sent back that contains a link to the property on your website! Alternatively, we could add a message that automatically responds saying how excited you are to see them this weekend. Next, you’ll associate a hashtag with the Text Code so you can easily find these leads later – let’s use 123MainStOpen for that too.
Next, you’ll include your Smart Number along with the text code on all your marketing materials. Perhaps you share your favorite listing photo on Instagram and add a caption like “Fantastic Open House on Saturday from 1-4pm! Isn’t it beautiful? Text 123MainStOpen to 555-123-1234 for all the details.” Holding back the property address and listing details will encourage more people to send a text!
Anyone who texts for info will become a contact in your SmartCRM if the number they texted from isn’t already there. Cool, right?
Creating Text Codes
You’ll find Text Codes in KvCORE under Lead Engine > Call and Text Capture. At the top of that page, you’ll see your Smart Number, as well as your default Text Code. Below that, you’ll see a list of existing Text Codes.
To create a new one, just click the ‘Add’ button!
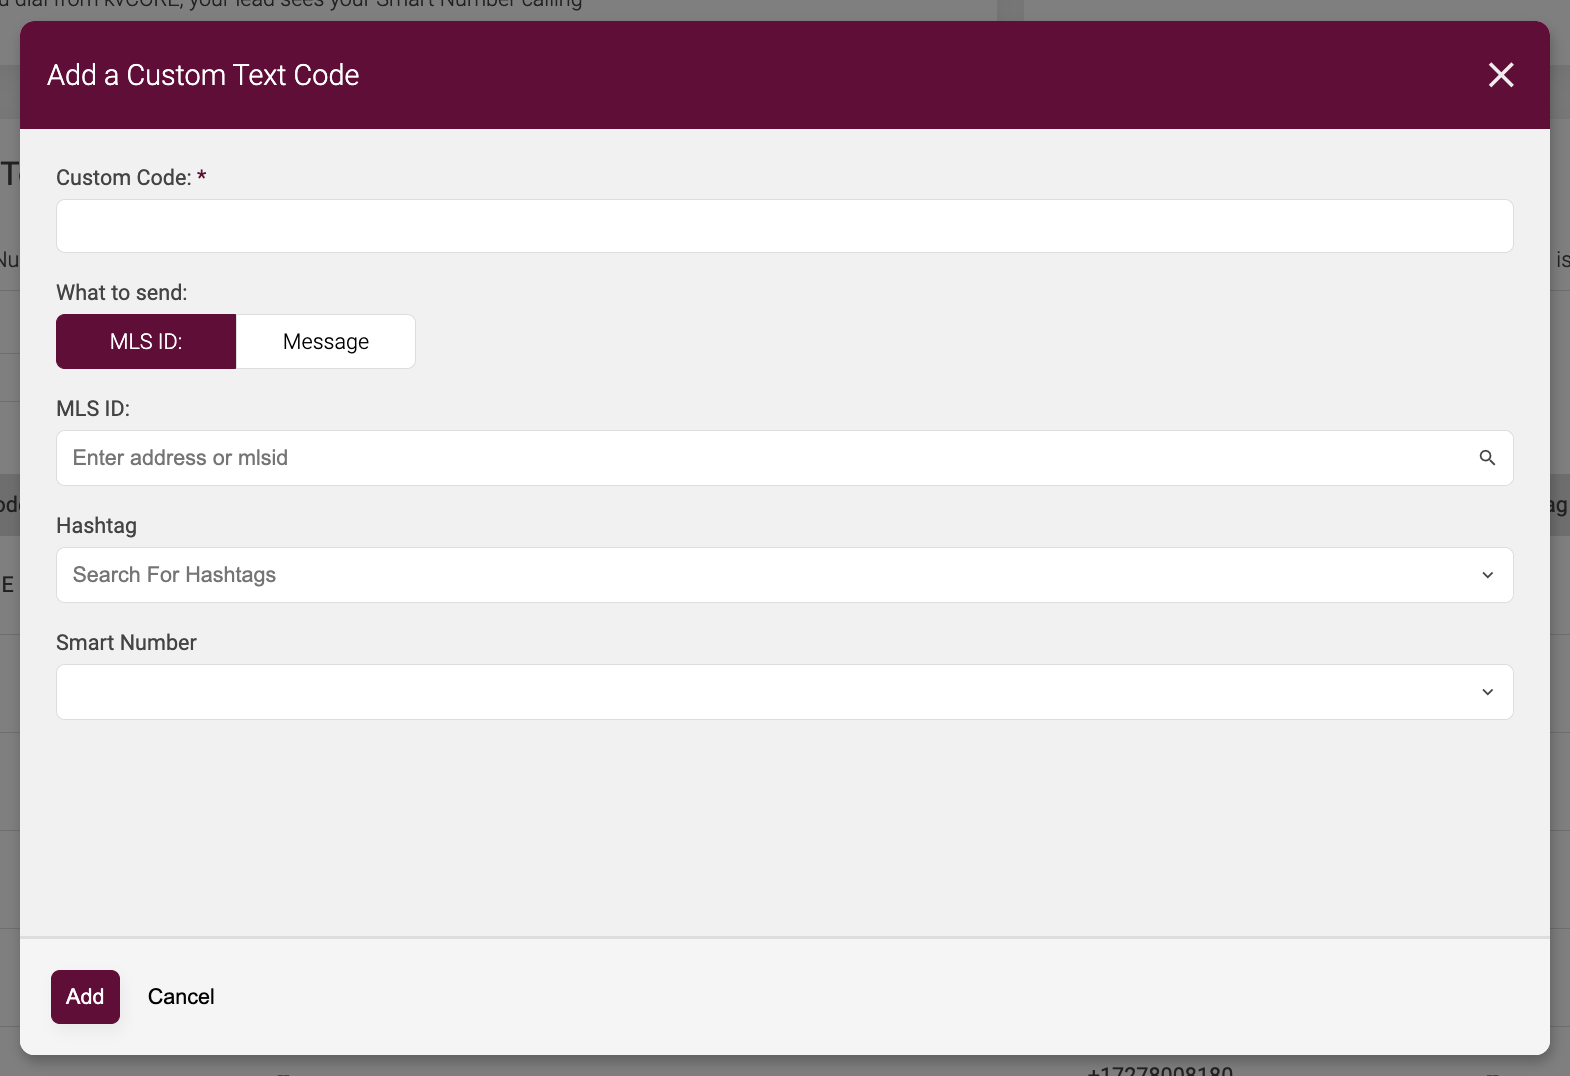
STEP #1 - Custom Code
Enter your desired Text Code in the custom code field.
The custom codes you create must be unique. They are on a first-come, first-served basis since you share a Smart Number with your Office or Team.
STEP #2 - Choose Response
Choose one or the other.
If you choose MLS ID, the response will contain a link to the property on the personal KvCORE website/subdomain of the person who created the code, the address, and beds/baths info.
If you choose a message, KvCORE will simply deliver exactly what was entered into the message field, which can contain a link.
STEP #3 - Assign Hashtag
Automatically apply the hashtag(s) of your choice to leads that are generated by your Text Code. This makes them very easy to find in your Smart CRM in the future.
In addition, you can create Smart Campaigns specifically related to these leads which begin when the hashtag is applied to a lead. A pre-configured search alert for similar homes, for example.
Choosing A Great Code
Your custom text code can be almost any word or alphanumeric phrase. However, you should keep it simple!
Try to avoid long number series as codes. This can get very confusing with some of the automated functions of custom text codes.
Avoid full addresses as codes. Addresses are far too long to type in, and they can also cause confusion for the client.
Keep it short! The shorter your code is, the more likely someone is to text it in.
Pro tip:
Don’t reuse text codes for different campaigns or you won’t be able to accurately track your success over time.
I Got An Error Message Via Text?
It says: “Your text to kvCORE will not be delivered. Please use KvCORE, the KvCORE mobile app or text your contact directly to respond.”
You will see this message if the phone number in your agent profile matches the phone number you are texting. We warned you! Please see the section above regarding not testing texting or calling using your own number for a full explanation.
Would you like to know more about Text Codes? Check out this support article.

Paid Lead Generation Options
KvCORE offers many paid add-on options which are available in the system’s Marketplace. Many of them are geared toward gaining new leads. Below is a quick review of some of the offerings available, but they are subject to change at any time.
Please keep in mind that these are all 3rd party tools offered by an external vendor. BHHS Florida Properties Group neither endorses these products or guarantees their results. Choosing to participate in these features is entire up to each agent, individually.
CORE Property Boost
CORE Property Boost allows you to take any of your listings and run Facebook ads to attract buyers.
While a great tool, please keep in mind that this is incredibly similar to your current FREE digital listing ads provided FREE through CHALK Digital and BHHS.
CORE Social
CORE Property Boost is a product offering social media automation.
While this is a good option please keep in mind that BHHS offers you Soci, a robust social media management tool for FREE through REsource Center.
Managed Google Pay-Per-Click Ads
Generates high-intent leads by creating ads on Google for you that appear when consumers search terms related to your area of focus (Ex – Tampa real estate). They’ll see your ad near the top of the search results page.
Google Display Branded Ads
Creates an ad that will follow your visitors around the web after they leave your website, pushing them back towards you.
CORE Multichannel
CORE MultiChannel gives you the combined power of lead gen and retargeting on Facebook and Google and instant follow up with CORE Concierge!
Get Seller Leads
Attracts home owners by using Facebook ads that opt them into regular reports about the value of their home. Set yourself up as a local expert and generate leads with validated contact information!
Facebook Buyer Ads
Leverage branded Facebook “listing carousel” ads that convert better than static or single property ads by giving viewers more options.
Voicemail Drop
Easily send noninvasive voicemails to your contacts and continue to grow your working relationship with them.
Facebook AI & Retargeting Ads
Content
Lead Concierge
Speed to lead is a key component of converting your online leads. Lead Concierge can help by reaching out to leads when you can’t, with fast and friendly correspondence!
NOSY NEIGHBOR
Nosy Neighbor leverages personalized postcards, targeted emails, and highly targeted display advertising to dominate your local market. Become your neighborhood expert with the help of Nosy Neighbor!
Would you like to know more about KvCORE’s Marketplace? Check out this support article.
Get To Know The Platform
Ready to introduce yourself to the system's features? Let's do this! Here's an introduction to KvCORE and its features. Want to go more in-depth? We've provided links to support articles that go into more detail.
Dashboard
Contacts
Automation
Website
Marketing
Lead Generation
DATA FEEDS
Upload Images
RECORDED WEBINARS
Downloads
Support

Connect With Support & Your Peers
There are plenty of resources available to you when it comes to this fantastic platform! From live support to recorded videos and online learning, you're sure to find what you need.
Our #1 Training tip?:
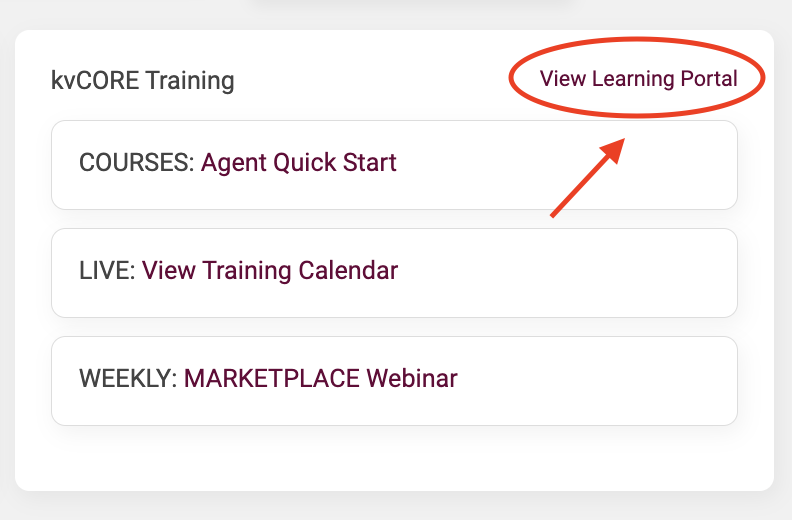 Take the 'Agent Quick Start' course available in KvCORE's Learning Portal once you gain access to your account. This fantastic resource is incredibly thorough and allows you to go at your own pace.
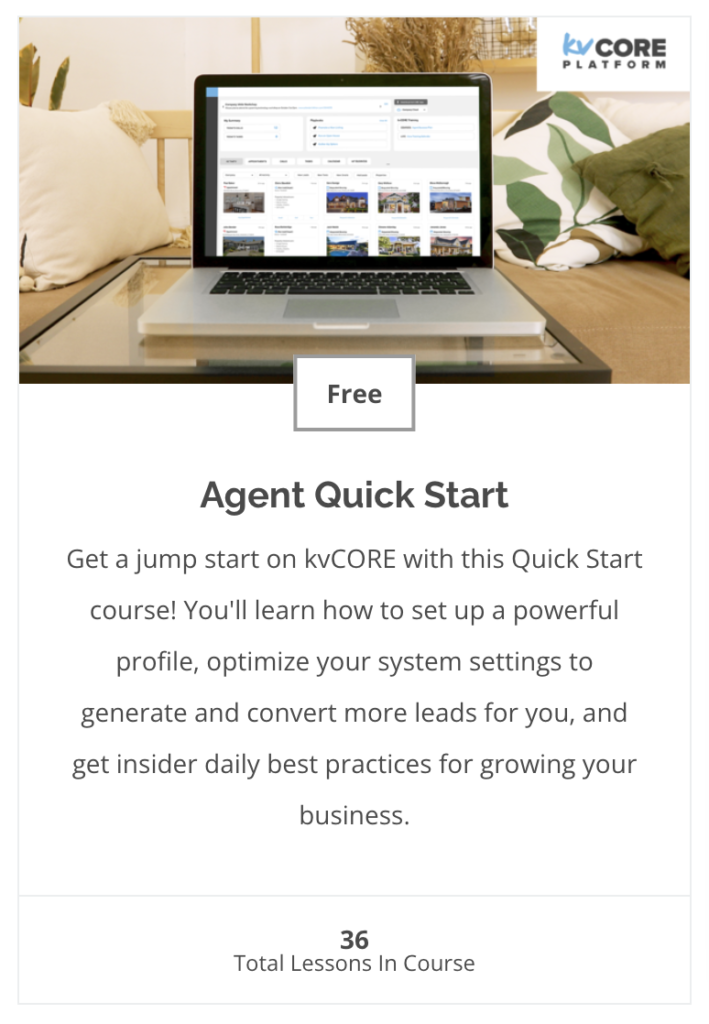 It's likely that you may be interrupted by something while you're learning, and this program is broken down into bite-sized pieces. It also allows you to pick right up where you last left off, whether you're at the end of a section or in the middle of a video.
Whether you're starting from scratch or just need a refresher this is truly one of the best resources available. We can't recommend it enough!
LIVE WEBINARS EVERY WEEK!
Whether you're new to the system or would just like a refresher, these live webinars are a great resource for getting to know the system.
View Recorded Webinars
A collection of past training sessions and webinars hosted by the KvCORE, team. Always available, 24/7.
KvCORE Facebook Group
A great place to see the latest chatter on the product and it's features. Join it to stay up-to-date on the latest news and tips!
KvCORE YouTube Channel
Always being updated, this is a great location to see a collection of how-to videos and tips for getting the most out of the system.
BHHS FLPG Support
Book A Virtual Appointment
Book a one-on-one virtual appointment with a service desk technician.
- https://www.picktime.com/bhhshelpdesk
- Monday - Friday: 6am - 5pm PST
Send an email to open a ticket with our service desk team. and they'll respond as soon as they're able with answers to your questions.
- servicedesk@bhhsflpg.net
- Monday - Friday: 8:30am - 5:30pm EST
Technology Day
Hosted 3 Fridays a month, this is an opportunity to book an in-person 30 minute one-on-one. Pick a date and location and book on our company calendar.
- https://blog.mycabcorner.com/company-calendar/
- Fridays 9:00am - 4:00pm EST, location varies
KvCORE Support
Click on the blue bubble in the bottom right corner of your KvCORE dashboard.
- Monday - Friday: 6am - 5pm PST
- Saturday - Sunday: 9am - 3pm PST
Get in touch with the KvCore support team via email.
- kvcore@insiderealestate.com
- Monday - Friday: 6am - 5pm PST
